@riya
Active 10 years, 11 months ago-

riya uploaded a new picture: hello kitty.JPG March 18, 2011 4:26 am
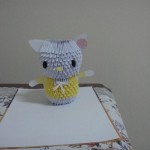 my first hello kitty
 -

estrella and
riya are now friends February 12, 2011 10:08 pm -
riya posted a new activity comment February 12, 2011 10:00 pm
Unbelievable and speechless on seeing your project , u r truly gifted mr.foos. after a long time here, otherwise i would have missed to see your raptor
-

i agree with you he is a modern day hero
-
-
-
riya posted a new activity comment October 23, 2010 11:48 pm
the feather look in the wings are excellent and very realistic, no doubt that you are an excellent 3DO artist, i think there is lot more to learn from you mr.Foos.
-

As crazy as it sounds (or maybe not) I think I have a lot more to learn also.
-
-
riya posted a new activity comment October 23, 2010 11:40 pm
please do post some more pictures of macaw as well as parrot.
-
riya posted a new activity comment October 23, 2010 11:39 pm
is the same technique used in parrot? i.e., is the wings continuous part of the body? and the body flows under the wings is empty?
-
It is. The wings are a part of the body at the top, where the neck meets the center of the wings. Then the body flows around a gag under the wing and reconnects with the rest of the body. If you could see under the wings you’d see a square opening about an inch wide by 3 incest long. I left that spot open to keep from pushing the wings up higher…[Read more]
-
-
riya posted a new activity comment October 23, 2010 11:33 pm
is the pieces used here for body, wings and beak are the same size used for the parrot?
-
In the first one (the parrot) I used 1cm x 2cm for the beak, 2cm x 4 cm for the body and 2.5cm x 5cm for the wings. Since the wings were part of the body I needed to make the pieces bigger so they would stand out against the body and give it more of a 3D look.
The second one (the Macaw) on the other hand used almost all 2cm x 4cm pieces, except…[Read more]
-
-
-
riya posted a new activity comment October 22, 2010 10:55 pm
have u chosen your next project?
-
I have an idea in mind. just spent the last week experimenting with a few ideas. Still trying to sketch out the detail. Don’t want to say just what yet. But I’ll keep you posted.
-
-
riya posted a new activity comment October 21, 2010 2:43 am
i understood the basic structure of the parrot, so i am going to fold my pieces from now onwards,how many pieces do we need for that.
pls post your diagrams as soon as you can -
riya uploaded a new picture: swan basket1.jpg October 21, 2010 2:43 am
 my first origami Swan Flower Basket
-
thnx jenn , yes, its just a cone shape.
-
That is so beautiful! Great job. you have a good eye.
-
thnx david , really very happy to see the comments on my first project, this is very encouragement for me.
i knew origami, just 2 months back, on seeing all the projects here,craves me to make something new and makes more interest in origami, especially the credit goes to your parrrot, really superb
i just want to make one parrot for me -
will u please help me to make my parrot?
-
I made mine using 2cm x 4cm pieces in Red, Dark Blue. Light Blue, Yellow Green, Yellow, White, Black and Off White. The Beak is made of recycle magazine paper. I started at the head and worked down to the tail. Then I added the beak.
What colors are you going to use?-
thank u so much, that u have come forward to help me. i just want to make your first attempt -parrot, this has less color compared to your second project macaw, i want to use the same colour u used in that.
-
In the first one I used light green, dark green, dark blue yellow and the beak is goldenrod (I cut up a postal envelope). the feet are floral wired wrapped with thin strips of the goldenrod.
-
thank you so much, for helping me out.
-
-
-
as iam not that much familiar in 3do , i have lot of doubts in ur project.
how did u make the neck part somewhat bending ie., the front side of parrot under the beak
and how u separate the front side of parrot from back side,i had noted only in your project, the front side is shown separately, its very nice
next how u attached the wings to the…[Read more]-
to make the neck I start with a ring of 26. I find the top and bottom of the head then work the top in wedges. (kind of like how you the make the wings on the swan.) Then curve each row down a little at a time. The wings are actually continuous from the body. Once I get to the part where the wings attach you have to assemble separately the tops…[Read more]
-
I’m sorry if I make it sound difficult. It’s really not.!!!
-
thank u so much… i understood the wings part .
but little bit confusing in the head part, as u said please post some more pictures, and can u make diagram for the head, it will very helpful for people like me who are the beginners of 3do and very much interested in learning that-
I drew a partial diagram when I started the Macaw. It just got too complicated at one point and I couldn’t figure out how to explain it in a drawing. Any way, what I do have I’ll scan and post as soon as I can.
-
-
the ring of 26, is the base for the neck? or it is the mouth part where the beak starts?
and how the front side looking different under the beak?-
It would be like the bottom row of your swanbasket. Just fit them a little loose so you can slip small pieces in the bottom to work outwards on the beak. as you start the head from the ring, pick a half for the top. If you are making it like my first parrot, i doesn’t really matter which 13 you use as it’s all one color any. Take that half and…[Read more]
-
yes, i understood what u say.thnx
-
i understood the basic structure of the parrot, so i am going to fold my pieces from now onwards,how many pieces do we need for that.
pls post your diagrams as soon as you can
-
-
-
-
-
-
-
-
I didn’t use a diagram. I sort of invented the technique. see below for more detail.
-
don’t sell yourself short. I’ve only been doing this style of origami for about 4 years. considering the project took 6 weeks to complete, I would have to be a series of videos. When I started going off on my own and make these pieces, I made a lot of mistakes. I have a box of projects that just plain didn’t work for one reason or another, but I…[Read more]
-
wow imagine how good you would be in 10 or 20 years,im only 11 so one day i might be as good as you
-
You do pretty good now. I’d love to see you 10 or 20 years from now.
-
-
-
-
riya posted a new activity comment October 21, 2010 2:40 am
yes, i understood what u say.thnx
-
riya posted a new activity comment October 20, 2010 10:41 pm
after doing projects like parrot and macaw, i think your next project should be more realistic than these two , i.e., it should depict a real model, i am looking forward to your next project, all the best for choosing a good model.
-
riya posted a new activity comment October 20, 2010 10:24 pm
thank you so much, for helping me out.
-
riya posted a new activity comment October 20, 2010 10:17 pm
the ring of 26, is the base for the neck? or it is the mouth part where the beak starts?
and how the front side looking different under the beak?-
It would be like the bottom row of your swanbasket. Just fit them a little loose so you can slip small pieces in the bottom to work outwards on the beak. as you start the head from the ring, pick a half for the top. If you are making it like my first parrot, i doesn’t really matter which 13 you use as it’s all one color any. Take that half and…[Read more]
-
yes, i understood what u say.thnx
-
i understood the basic structure of the parrot, so i am going to fold my pieces from now onwards,how many pieces do we need for that.
pls post your diagrams as soon as you can
-
-
-
riya posted a new activity comment October 20, 2010 10:13 pm
thank u so much… i understood the wings part .
but little bit confusing in the head part, as u said please post some more pictures, and can u make diagram for the head, it will very helpful for people like me who are the beginners of 3do and very much interested in learning that-
I drew a partial diagram when I started the Macaw. It just got too complicated at one point and I couldn’t figure out how to explain it in a drawing. Any way, what I do have I’ll scan and post as soon as I can.
-
-
riya posted an update October 20, 2010 7:42 pm
hi, i am new to origami, what type of paper can be used for this?pls somebody help me
-

me too i like 24lb more than other….
-
thanks jenn and isabelle.
but its hard for me , to find dark colour printer papers. -
thanks, this will help me out
-
i find my color paper in wallmart. For bron and black i use cardstock paper in scrapbook supplies. Jewellia7777 on youtube made a tutorial for folding cardstock paper
http://www.youtube.com/user/jewellia7777 when you use cardstock paper you have 60 pieces in one sheet that awesome. In canada we have staple store , walmart, zellers, deserres to find paper.
-
-
I used color printer paper mostly. sometimes i use bits and pieces from old magazines. sometimes you can find fliers printed on one side only. I like to recycle as much as I can.
-
im going to try to paint the colors on mine.
-
but do any of you know where to get black paper from
-
If you don’t mind using wrapping paper. most hallmark store carry solid black. otherwise try black origami paper. I’ve used both in the past and they seem to work just fine.
-
thanks
-
-
-
-
-
-
riya posted a new activity comment October 19, 2010 10:10 pm
as iam not that much familiar in 3do , i have lot of doubts in ur project.
how did u make the neck part somewhat bending ie., the front side of parrot under the beak
and how u separate the front side of parrot from back side,i had noted only in your project, the front side is shown separately, its very nice
next how u attached the wings to the…[Read more]-
to make the neck I start with a ring of 26. I find the top and bottom of the head then work the top in wedges. (kind of like how you the make the wings on the swan.) Then curve each row down a little at a time. The wings are actually continuous from the body. Once I get to the part where the wings attach you have to assemble separately the tops…[Read more]
-
I’m sorry if I make it sound difficult. It’s really not.!!!
-
thank u so much… i understood the wings part .
but little bit confusing in the head part, as u said please post some more pictures, and can u make diagram for the head, it will very helpful for people like me who are the beginners of 3do and very much interested in learning that-
I drew a partial diagram when I started the Macaw. It just got too complicated at one point and I couldn’t figure out how to explain it in a drawing. Any way, what I do have I’ll scan and post as soon as I can.
-
-
the ring of 26, is the base for the neck? or it is the mouth part where the beak starts?
and how the front side looking different under the beak?-
It would be like the bottom row of your swanbasket. Just fit them a little loose so you can slip small pieces in the bottom to work outwards on the beak. as you start the head from the ring, pick a half for the top. If you are making it like my first parrot, i doesn’t really matter which 13 you use as it’s all one color any. Take that half and…[Read more]
-
yes, i understood what u say.thnx
-
i understood the basic structure of the parrot, so i am going to fold my pieces from now onwards,how many pieces do we need for that.
pls post your diagrams as soon as you can
-
-
-
-
don’t sell yourself short. I’ve only been doing this style of origami for about 4 years. considering the project took 6 weeks to complete, I would have to be a series of videos. When I started going off on my own and make these pieces, I made a lot of mistakes. I have a box of projects that just plain didn’t work for one reason or another, but I…[Read more]
-
wow imagine how good you would be in 10 or 20 years,im only 11 so one day i might be as good as you
-
You do pretty good now. I’d love to see you 10 or 20 years from now.
-
-
-
-
riya posted a new activity comment October 19, 2010 9:58 pm
thank u so much, that u have come forward to help me. i just want to make your first attempt -parrot, this has less color compared to your second project macaw, i want to use the same colour u used in that.
-
In the first one I used light green, dark green, dark blue yellow and the beak is goldenrod (I cut up a postal envelope). the feet are floral wired wrapped with thin strips of the goldenrod.
-
thank you so much, for helping me out.
-
-
- Load More
nice, it looks like my pink one 😀